Back in February I drew this sketch on a receipt, of the revamped master closet of my dreams:
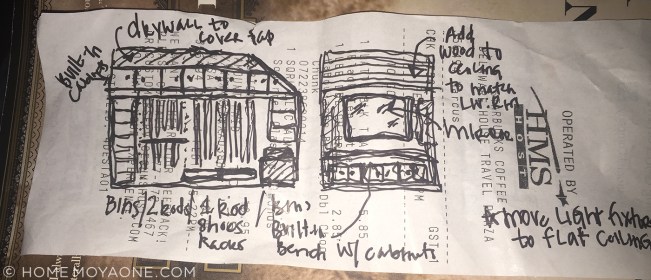
(It was very dark when I drew it; I didn’t realize I was drawing on the front of the receipt.)
(Also, this isn’t really the master closet of my DREAMS-dreams, but more like the master closet of my “we-can-actually-accomplish-this-ourselves”-dreams.)
Over the past five months, I’ve drawn up plans for the closet, tweaked and adjusted those plans, tweaked and adjusted some more, ordered supplies, and SLOWLY begun work. So slowly! We tore out the old shelving in February, but the closet has been mostly stalled for months while I was wrapped up in client projects. Over the past few weeks though we have finally—finally!—made real progress.
Before we get into all the details, here’s what the closet looked like before:
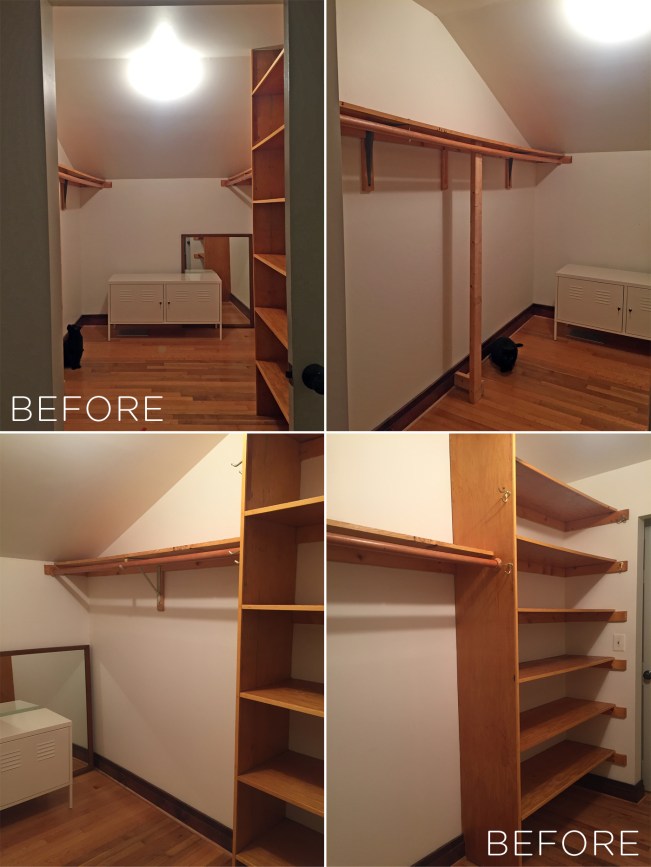
It’s 6′-7″ wide by 9′-11.25″ deep—pretty big! It’s actually the smaller of the two closets in the master suite, but still plenty roomy enough for J and I to share it: his clothing on the right; mine on the left. The larger closet is slated for a bigger purpose, and the need to get that done is really putting pressure on us to finish in here.
I removed all clothing from the room before I took photos, but just imagine stacks of shirts and pants on those shelves, half fallen-over, half crumbled and shoved whichever-which-way. It was ALWAYS a mess. I was constantly refolding clothes that had come unfolded, or just giving up and letting it all go to hell. Shelves are NOT good for clothing organization. The rod situation was pretty pathetic as well (uh, that brace thing happening on the left side?), and the shelves above them were warped, and frankly kinda gross. And there was so much wasted space above the rods—this space clearly needed some optimization.
We measured all our clothing, shoes, etc., to take stock of the square footage and types of storage space we needed, and then I drew up a number of design plans.
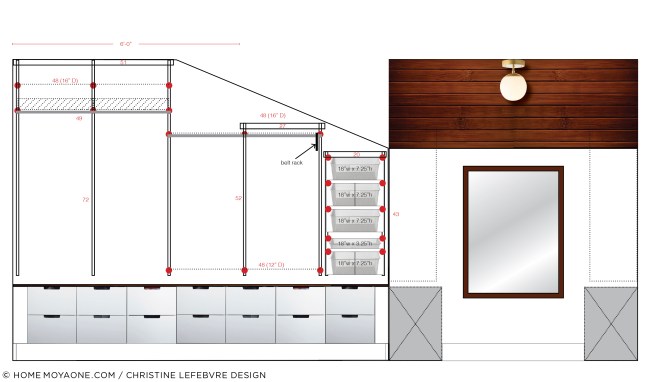
The design above is an early one (showing the left side and back end of the room) that was very similar to my initial sketch. I really wanted to do cabinets high on the walls. I imagined that we’d modify the cabinet meeting the angled ceiling to match the ceiling angle, and we’d cover the gap above the cabinet with drywall to make the cabinets entirely built-in. I worked out a number of versions of this idea, using differently sized cabinet doors and hang heights, but ultimately J wasn’t on board, and in hindsight it would have been more drywall work than I wanted. (Not that drywall work wasn’t in my future!) Still, I’ll save this idea for some other angled-ceiling closet reno down the road….
I moved onto the idea of installing a bank of drawers with bench tops around the perimeter of the room. After dozens of revisions (and a close call with a bad measurement) we settled on this:
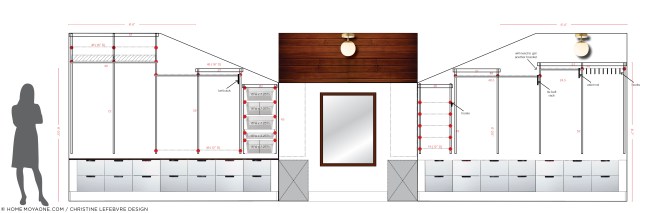
In previous versions I had the drawers wrapping around the back end of the room, or only taking up half the right wall of the room. We like the symmetry of having drawers running the entire length of both walls. This solution will also make installation easier, as everything can terminate into the corners of the room, and we don’t have to built a box for ventilation below the drawers that would run over the floor vent.
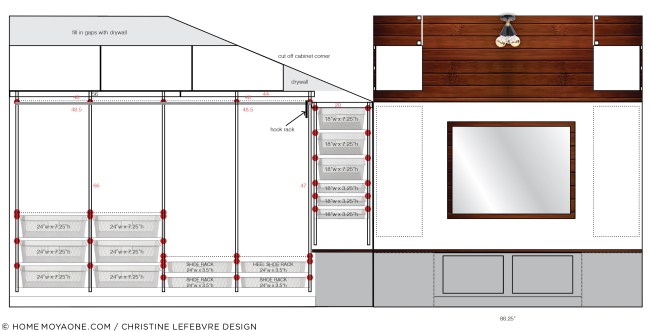
Here’s the design in plan, which may help to clarify the intent:
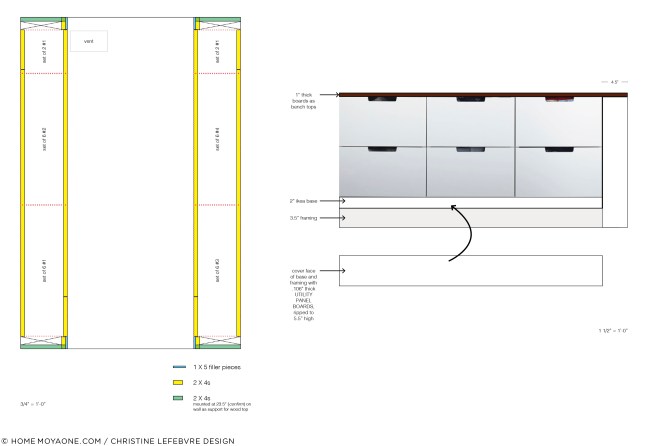
A few key elements have persisted since my initial sketch: 1. the addition of wood paneling on the angled portion of the ceiling, to match the wood paneling on the angled ceilings in our entry and living room; 2. installation of built-in storage (low drawers now instead of high cabinets); 3. installation of Elfa rods, shelves, and baskets; and 4. use of a large vintage mirror we picked up ages ago at an estate sale.
But back to construction…
After I moved my clothing, we tore out the old shelving. We picked up the cabinets from IKEA, and the shelving components from Container Store, during their Elfa sale. We ordered a new ceiling fixture (more on that below) and then I had to get to work.
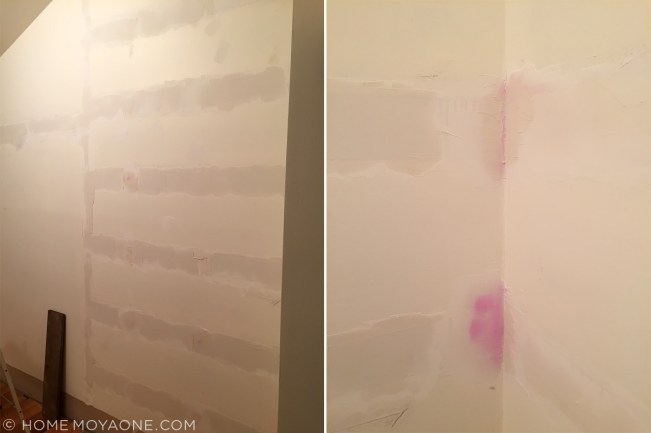
First, I had to fix the drywall. (I dragged my feet on this for the longest time…) The old shelf supports had left indentations in the drywall, and corners were cracked in places. I slathered spackling over the indentations, and taped and spackled the corners. (The photos above were taken soon after I put on the first coating of spackling—I used the kind that turns from pink to white to indicate that it has dried.) Then I sanded (while wearing a good respirator), spackled again, and sanded again. At some point I ran out of the pink spackling, and used joint compound that I had on hand. I believe I repeated this a third time. It was messy and awful, but eventually the walls were to a point where they were smooth enough—not perfect, but SO much better than if I hadn’t put any work into them—and ready for primer.
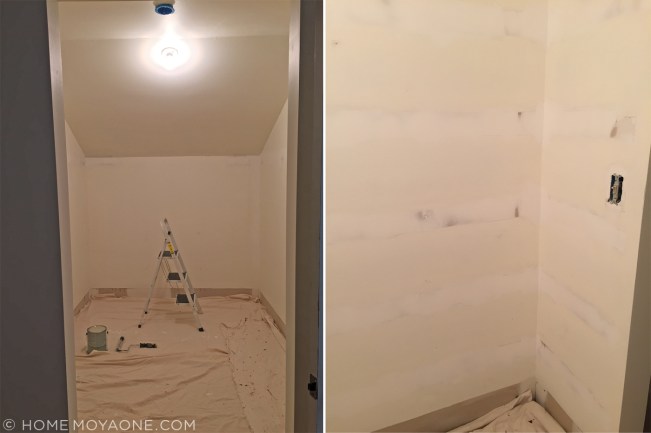
I then cut a hole in the ceiling and inserted an old work box for our new light fixture. The old fixture was on the angled part of the ceiling but we wanted it on the flat part so that it wouldn’t interfere with the wood paneling. It was a simple matter to move the wiring in the attic and run it through the new box. The previous “fixture” was just an old paint-smeared porcelain keyless lamp holder—you know the kind, basically just a bare bulb—so I pulled together some options for a new fixture:
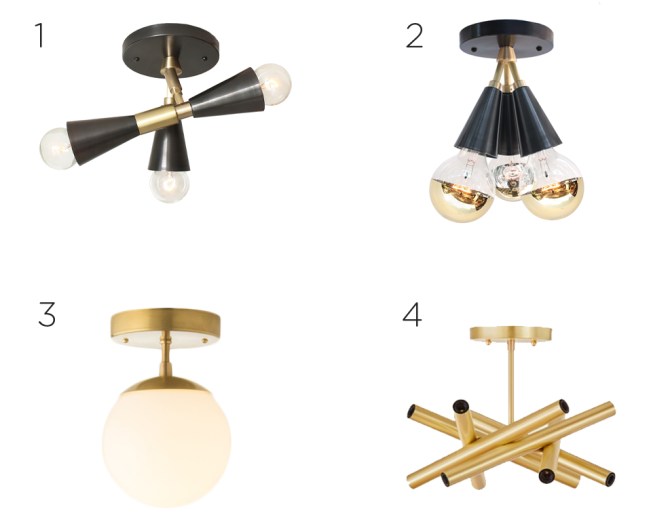
1. Cedar & Moss Leopold / 2. Cedar & Moss Spectra / 3. Schoolhouse Nova / 4. Lucent Lightshop Vortice Petite
A while back we installed the Leopold fixture (#1) just outside the closet in the guest suite and I was tempted to repeat it here, or to go with the similarly-styled Spectra (#2). Ultimately we chose the Nova (#3) because J liked the look of it and we only wanted to deal with one light bulb in this room. You can see the Nova (sans globe) in one of the photos below. Spoiler: it looks really nice.
Once I had the walls primed and painted (in Benjamin Moore’s Cloud White, our standard house white), we turned our attention to the ceiling.
The idea was to add 6″ V-joint tongue-and-groove paneling to the angled portion of the ceiling, to match what we have in the entryway and living room. We found a local source and picked up 18 boards (three packs of six boards) of Southern Yellow Pine, grade C (for clear) or better. We ended up having not a board to spare, as four of the boards were too squirrelly to use and we needed 14 boards total. (It was a little tense when we realized we could not mess up a single cut!)
Below, on the left, is the ceiling in our living room. I didn’t realize how patchworky the colors (and wood grain patterns) were until I tried to “match” it. And, truth be told, I had a very hard time matching it. (Actual truth be told, I didn’t.) My first stain attempt was way too dark and too red. I ended up sanding the boards down and re-staining them. My second attempt was again too dark. I swear, I’m usually good with stain! (On the right is a photo of the boards I stained to match.)
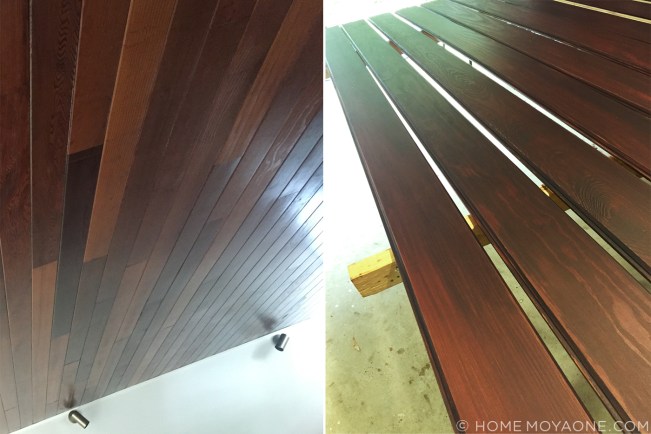
Part of the problem was the pine itself. It kinda sucked. Even though I prepped the wood by sanding and using wood conditioner, the pine took the stain inconsistently and looked splotchy with only a couple coats on, forcing me to add more stain in an attempt to level out the color, while also continually feeling like the color was still NOT. QUITE. RIGHT. The wood grain was assertive, and the test boards I made didn’t reflect the reality of how inconsistently the boards would take the stain. In the end I used five different colors (of General Finishes water-based wood stain—a product I really like), some combination of Antique Cherry, Black Cherry, Walnut, Antique Oak, and/or Early American. I can’t tell you exactly what I used because I don’t know. Some of the colors I used during my first attempt, some during my second, some during both…. My frustration was not helped by the fact that it was in the 90s with out-of-control humidity while I was working in the garage.
Also part of the problem was that I was TOO consistent across all the boards. I matched a board that I thought was middle-of-the-road as far as color and darkness, but the overall effect was too dark without some lighter boards in the mix. If you take another look at the photo of the living room ceiling, notice all those light brown boards. I couldn’t bring myself to mess with the stain any further though—the project HAD to keep moving—so I sealed the boards with a couple coats of General Finishes’ water-based polyurethane topcoat and brought the boards inside the house to acclimate.
Ultimately, despite all the frustration, and my griping, the boards look great on the ceiling, and they’re far enough from the entrance that you wouldn’t know that they’re darker here than there. Also, this is a closet, without any windows, so everything looks darker. ALSO, the super-bright LED light bulb currently in the room while we work does not do anyone’s complexion any favors.
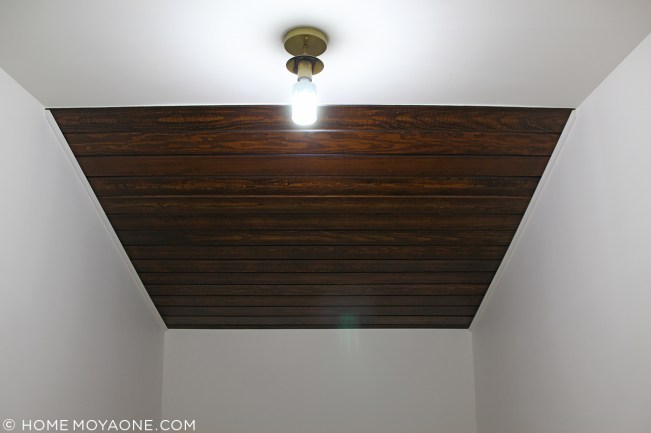
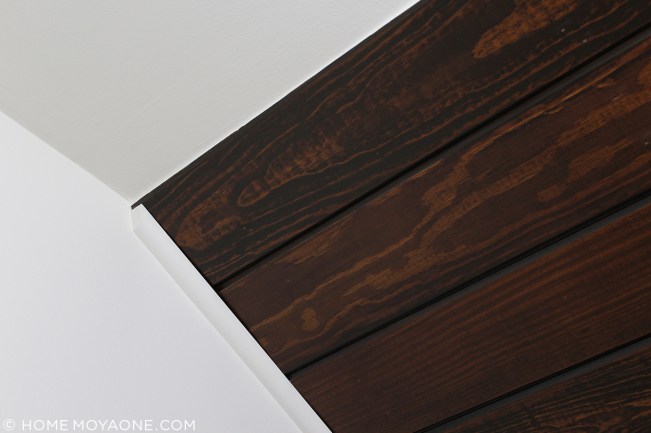
J and I worked together to put the boards up, with him holding them in place while I nailed them into studs with a gun, and both of us using a rubber mallet to force the boards’ tongues into grooves. (There are no photos of this because it was a pretty active process.) He cut bevels on the edges of the first and last boards so they mated neatly with the ceiling and back wall, and I caulked and painted the joints to make the junctions seamless. I used Minwax Wood Putty in Red Mahogany to fill the nail holes, and you’d need an eagle eye to spot them now. On the sides of the ceiling, we added quarter round trim, which I caulked on the wall edge and painted the wall color, to match the trim detail on the ceilings at the other end of the house.
So here’s where we stand. Completed to date:
• design
• demolition
• wall repair
• walls and ceiling primed and painted
• wood ceiling stained, cut, installed, and trimmed
• light fixture installed
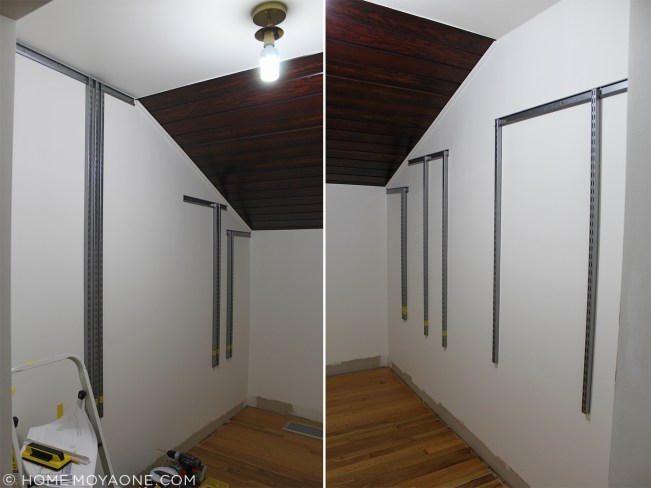
• Elfa tracks installed
We’re getting there! Even though the project has been slow-going, we really have a fire under our asses now—I’ve given us a deadline of July 23 to finish and move in. That means we have two more weekends to:
• build bases for the built-in drawers
• install built-in drawers
• install baseboards; caulk and paint
• cut, stain, and install wooden tops for the built-in drawers
• install Elfa components
• move in!
We got this…

3 Responses to Plans and progress on the master closet
You are amazing!
Let me repeat that…Amazing!!
Can’t wait to see it all and the reveal on the larger closet purpose in Oct 😊
Xo
Thanks Mel!! :)
Very Cool! Looking forward to seeing the changes in August! Love you guys!