I have a big update concerning the hall bathroom!
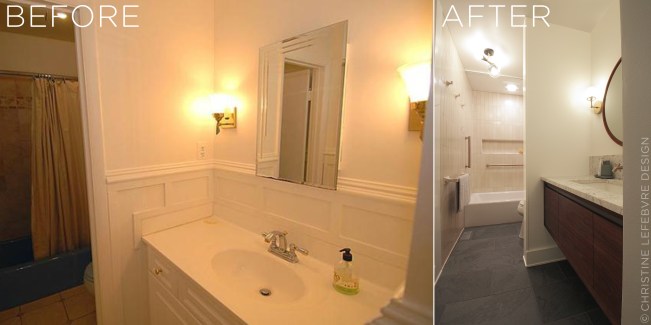
Last I left you, it was November 2016 and I had torn off the, er, inelegant wainscotting to discover a hot mess of wallpaper, painted-over wallpaper paste, and signs of water damage. I had removed the medicine cabinet and patched over the hole, but we still had the 90s travertine-look tile with a band of accent tile and corner shelves that I despised; a blue tub and mis-matched, worn-out blue toilet; a grungy-looking floor; other eyesores.
Originally my plan was to do a “spruce up” but I lost momentum on the project; this, that, and life happened … and J and I lived with this torn-up bathroom—

—for nearly three years. We put up the pretty mirror and sconces from my original plan but the room was still unpleasant and distasteful.
Then we changed course. We decided to go for it, and the “spruce up” morphed into a complete renovation. I got serious about the design. We hired out the labor. The project was expensive, truth be told, but worth it.
So worth it:
I started the design process in September 2018, construction began in January 2019, and—following a frustrating tile setback, which I will describe later—we had our brand new bathroom in early March.
I wanted the bathroom to look like it had always been there, but without period clichés; timeless and fresh; high end yet grounded; spacious. There were a number of design iterations, primarily for the tile layout. I finessed the design drawings, and finessed them some more. (It’s hard being your own client!) I researched finish materials and compiled an exhaustive spreadsheet of everything we would need to purchase—from the tiles and vanity down to the plumbing valves and toilet handle.
Here are a few of the final drawings I prepared:
After—because of—the design effort, the bathroom turned out exactly how I imagined, thanks in large part to our fantastic contractor, Cory Sanna of Always A Project. He did all of the construction and interfaced with the subcontractors.
To get started, he removed all wall materials to the studs and removed multiple layers of flooring to get to the subfloor, revealing a blank canvas to build upon. The only thing that remained was the ceiling. Out went the old blue tub, the old blue toilet, and the vanity with stained countertop and terrible storage. In went … everything new!
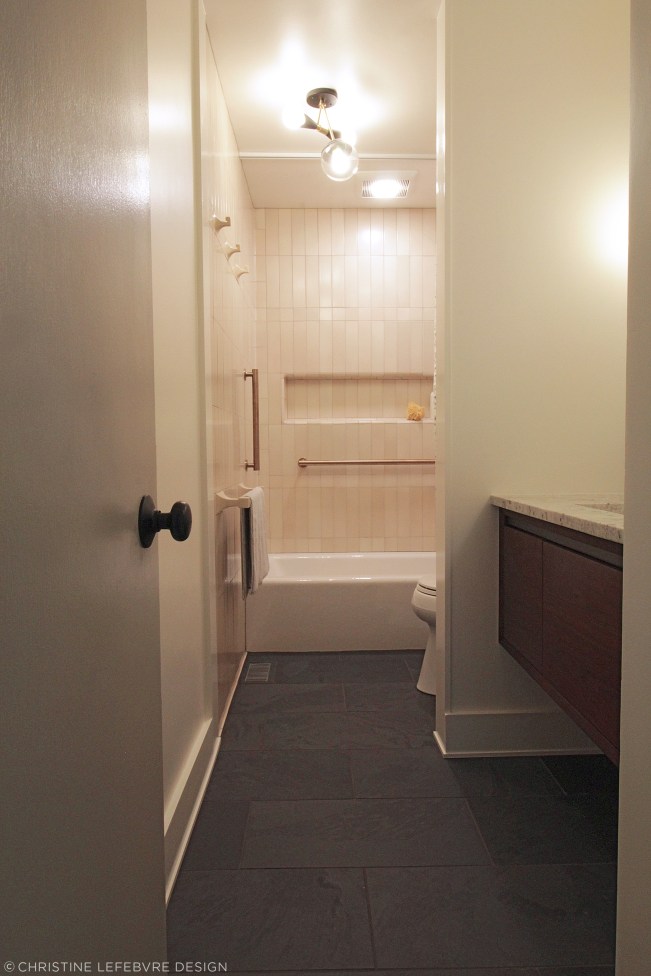
Take another look at the leftmost “in progress” photo above, and you’ll see there was a narrow door frame. At some point J and I removed the door because it made the inner room feel cramped. For the redesign, I had the door frame and wall above removed entirely, and the opening widened slightly. There is still a sense of privacy (just in case) for someone on the toilet because the perpendicular wall remains—and the entire space feels so much larger.
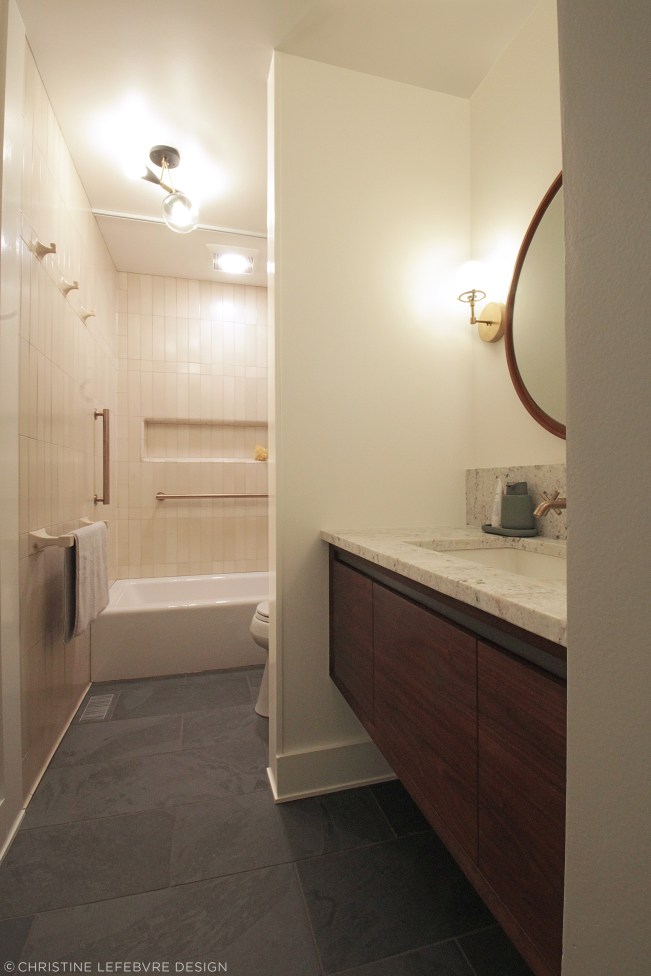
Vanity

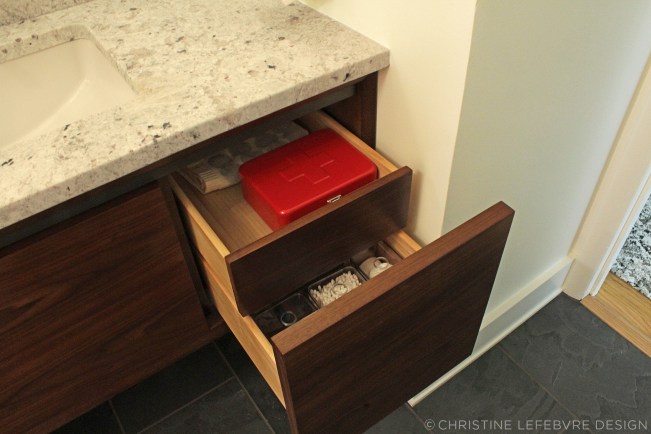
I further enlarged the space, visually, by replacing the old clunky vanity with a minimal floating one. I like the vanity’s walnut veneer and clean lines, and the way the metal detail visually relates to the slate flooring. The amount of storage is more than adequate for this bathroom, and it has push-to-open, soft-close drawers.
Sink
The counter was fabricated from a remnant of Colonial White granite that I found at a local stone yard. I specified a honed finish that feels wonderful to the touch and looks more organic than polished granite. The under-mount sink is luxuriously large, and its rounded bottom visually relates to the circular mirror above it. (And the circular mirror we have at our entrance, and the circular window in our office, and the various globe lights throughout the house….)
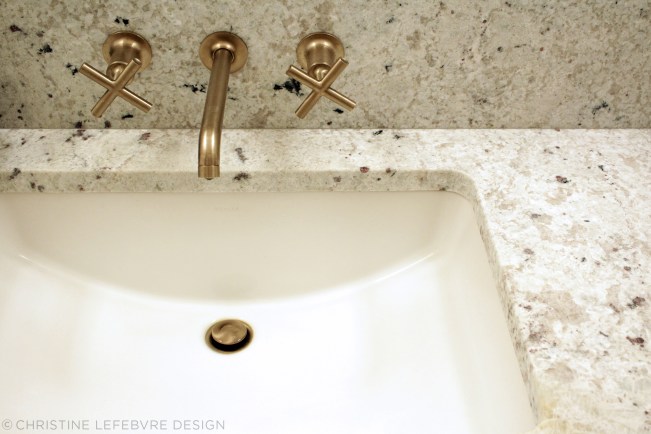
I had some nerves about the details I specified for the wall-mount faucet. Will the height work? Will the faucet projection/sink combination make the water splash? In the end it worked out perfectly, and I love the look of the Kohler Purist faucet and cross handles on the 8″ high backsplash. All fixtures are in Kohler’s Vibrant Brushed Bronze finish.
I also had the electrical outlet moved to a more discreet location, on the right side of the sink instead of the left, tucked into the corner. No need to put your outlets front and center, folks.

Flooring
The flooring is 12″ x 24″, 3/8″-thick, natural slate tile. It feels lovely underfoot—cool but not cold. A special detail that I highly recommend is a Chameleon floor register. It’s a metal frame that is installed directly on the subfloor, flush with the finished floor. Your installer cuts your flooring material to fit within the register’s channels, and you get a seamless, fancy floor.

Stay tuned for Part 2—I’ll talk about the “wet room,” tile adventures, and more!

One Response to Hall bathroom reveal, part 1
It’s stunning! Great job
Love following along w your redo