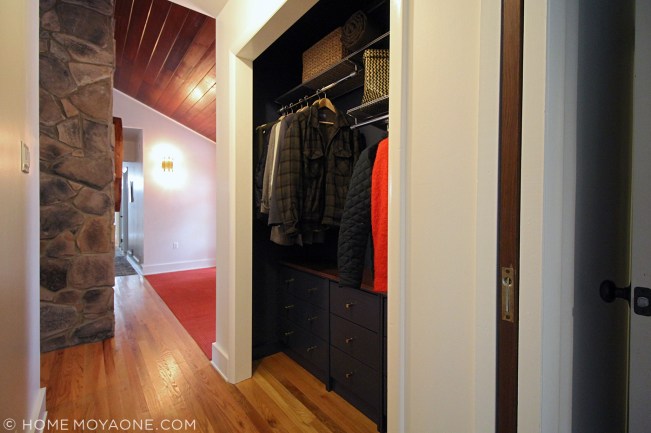
After some problem-solving, some sawing, drilling, and painting, and a lot of time spent waiting for paint to dry, we went from having a generic, space-wasting, yawn of a shelf-and-rod closet to a swanky closet with plenty of storage.
Before—I seem to have not taken a photo of it full of coats and overflowing bins of scarves and dog toys and sunscreen, but I’m sure you can imagine:
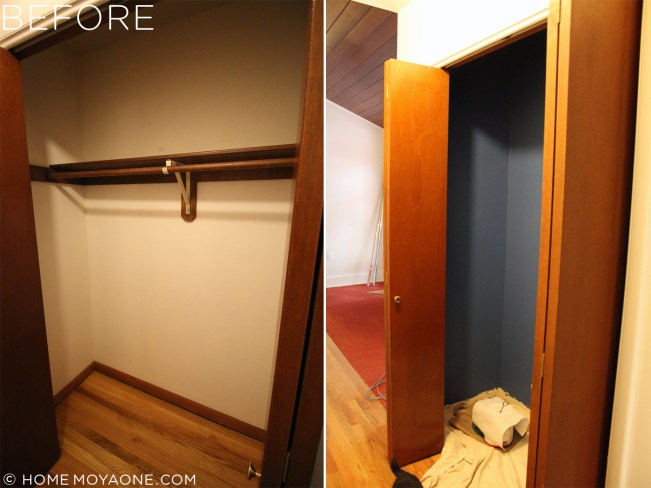
We started by taking down the shelf and rod, and the 70s-era baseboards. I patched all the holes, painted the walls and ceiling—in a blue I immediately disliked—and then repainted the walls and ceiling—in Benjamin Moore’s Gravel Gray. At first we intended to keep the original bi-fold doors, but I decided “too wobbly!” and took them down as well, and off they went to Community Forklift.
I didn’t really have a concrete plan beyond making some sort of Elfa configuration. (Heads up: the Container Store is having their shelving sale.) Then I saw a cute IKEA hack, here, and decided to follow her lead. I picked up two IKEA Rast chest of drawers, with the idea to use one on either side of the closet, with a set of stacking baskets (already owned) placed in between. The baskets didn’t fit, so other ideas were batted around: perhaps we could hang a long Elfa standard down the center and hang a row of Elfa mesh baskets; perhaps we could build open shelves between the two Rasts….
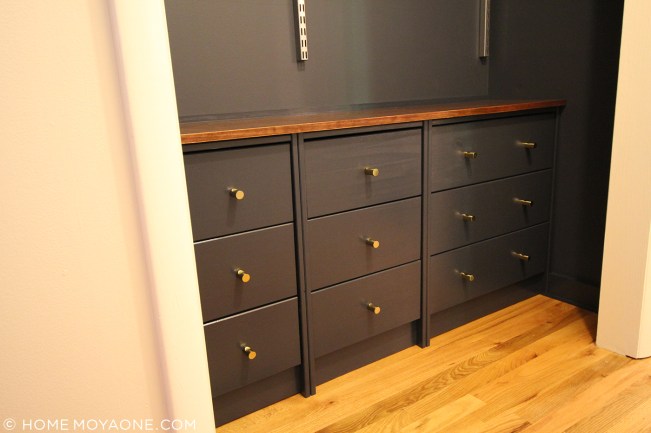
The idea I settled on was to cut a third Rast to fit the space in the center between the two full-size chests. (Jamie was very skeptical, but ask him now and he’ll say it was his idea, naturally.) Back to IKEA I went, to buy another chest of drawers.
I placed the two full-sized chests into position, shimmed as needed, and carefully measured, and measured again, the space between. I then cut all the horizontal pieces to fit—in my case, I needed to take an even 8″ off the width of the center Rast.
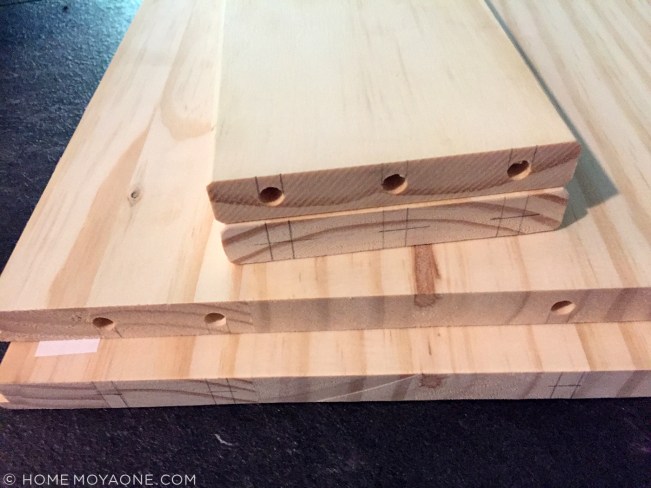
I then needed to recreate the dowel holes from the ends I had cut off, so careful measuring commenced again as I marked the locations to drill new dowel holes. Now, I can use a compound miter saw, and a pneumatic nailer, and other scary tools—but I’m not terribly confident in my power drill skills. So I asked Jamie to drill the holes for me. I waited…kind of a while…and eventually he drilled the holes, and while every hole was not perfect, they were all good enough that the mini hacked-Rast came together perfectly.
Then, we slipped the mini Rast into its spot, and it fit—perfectly. Phhhhhew.
I removed the drawers and painted them inside and out with Behr’s Alkyd Semi-Gloss Enamel, also in Benjamin Moore’s Gravel Gray, along with the interiors of the chest frames, and their front edges.
If I were to do this again, I would paint all the Rast parts before assembly. And word to the wise: the Aklyd paint is quite durable when it’s fully cured, but it takes forever to get there—at least a month. To check if your paint has cured, push a finger nail into an inconspicuous spot. If you can leave an indentation, it hasn’t cured fully.

I clamped the three frames together, and enlisted Jamie’s help again for more drilling. He counter-sunk screws, near the front edges and near the backs, to hold the frames square to one other. He placed the screws in line with the dowel holes where the drawer tracks would go, to ensure they wouldn’t be visible when the drawers were put back in.

I experimented with different wood top arrangements and settled on a three-piece solution. The picture above labels the three parts: Part 1: a 10″ x 1″ select pine board; Part 2: a 2″ x 1″ pine board; and Part 3: a 1/2″ x 1/2″ piece of pine trim, all cut to the width of the closet.
I tacked Piece 2 to the chests with an 18 gauge brad nailer. I placed Piece 3 on top of Piece 2, and tacked it to the wall, then spackled the nail holes, caulked the seams, and gave the new trim a couple coats of the Alkyd paint.

I also tacked the backs of the frames to the wall, so they won’t wiggle with normal use. [In case you’re wondering: I have this 18 gauge brad nailer, from Wen. It’s much smaller and lighter than the 16 gauge nailer I use for baseboards—great for quick tasks, and delicate lady hands! I like it.]
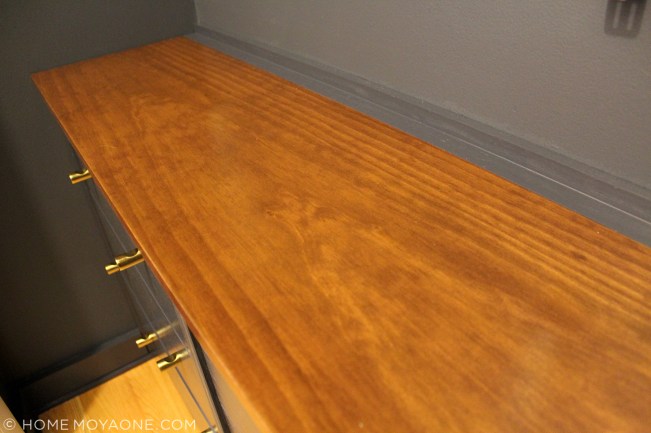
The 10″ x 1″ board got some affection: two coats of General Finishes Water-Based Wood Stain in Antique Cherry, followed by three coats of General Finishes Water-Based Polyurethane, Flat, lightly sanded between coats. It’s sumptuous: so pretty, and so soft to the touch. Jamie screwed it to the tops of the chests, from below.
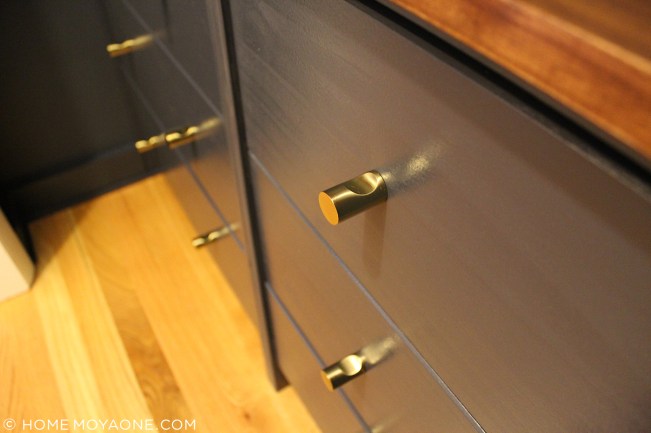
We installed 15 Cerco knobs from Anthropologie (two per drawer for the regular Rasts and one per drawer for the mini hacked-Rast), inserted the drawers—and oh, I’m in love.
Here are the three chests, all together:
I considered installing trim over the seams between the chests, but ultimately decided that the small reveal didn’t bother me. At some point during all this I also installed and painted baseboards, in the new streamlined style I’m installing throughout the house.
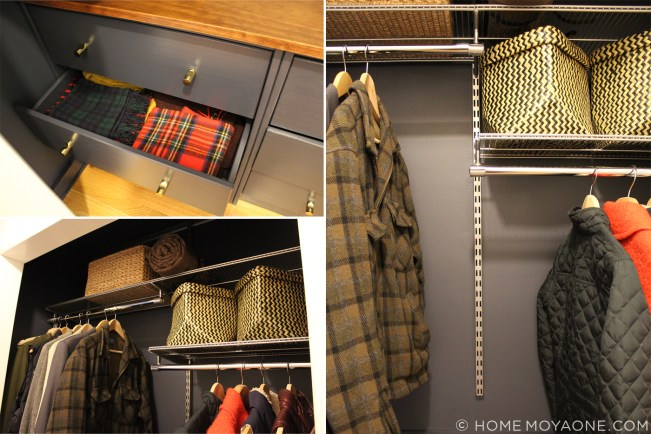
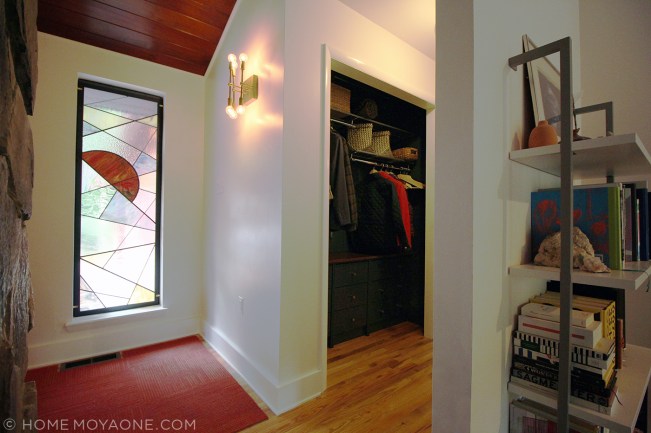
We installed an Elfa track at the very top of the closet and three 60″ standards (we happened to have the standards from an Elfa arrangement at our last apartment), and hung three ventilated shelves and two rods.
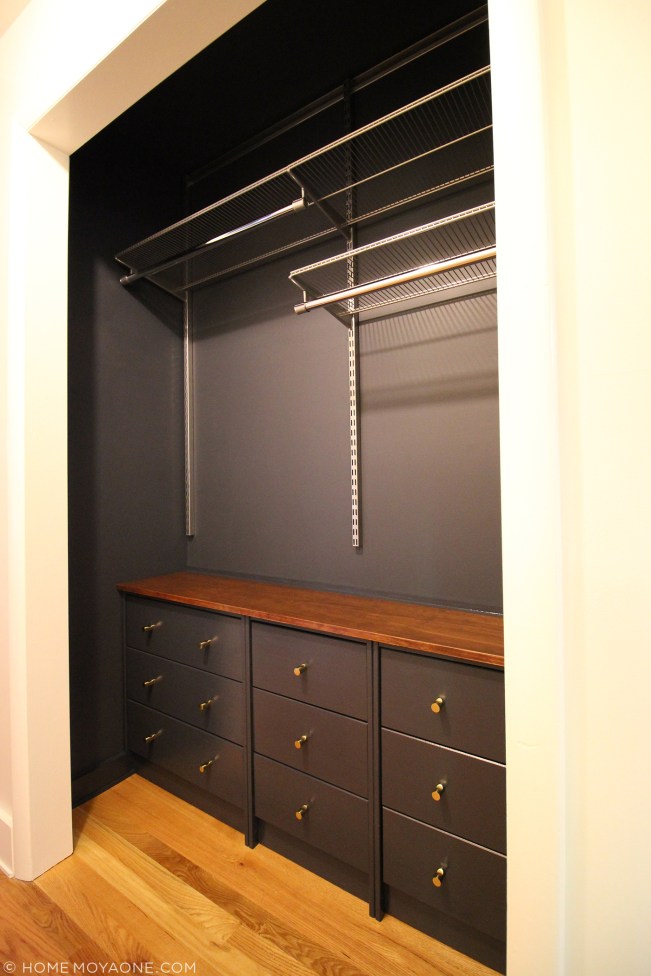

If needed, we can always rearrange or add to the Elfa components—the beauty of a modular system. And the drawers fit a surprising amount of stuff. I think the closet looks so sharp, I’m not sure I want to install new doors.
And finally, one last view, from the living room:
sources: paint color / drawer and trim paint / chests / drawer knobs / wall shelving / rectangular basket / sea grass baskets (similar—no longer available)

3 Responses to Our swanky new coat closet
I continue to be amazed! It’s beautiful!!
Thanks!
Very cool. Looks great!