Last March we started on our “kitchen refresh.” Here’s the last post I wrote about it. (Definitely read it for the gross “before” photos.) Last we talked, the kitchen was a wreck.
And then I left you hanging!! We did not stop working—in fact we’ve kept up a spate of house projects over the past nine months, and hosted a big summer wedding to boot—but this little blog just sat on the back burner, not even simmering, just sitting there…. Sorry! Please allow me to catch you up:

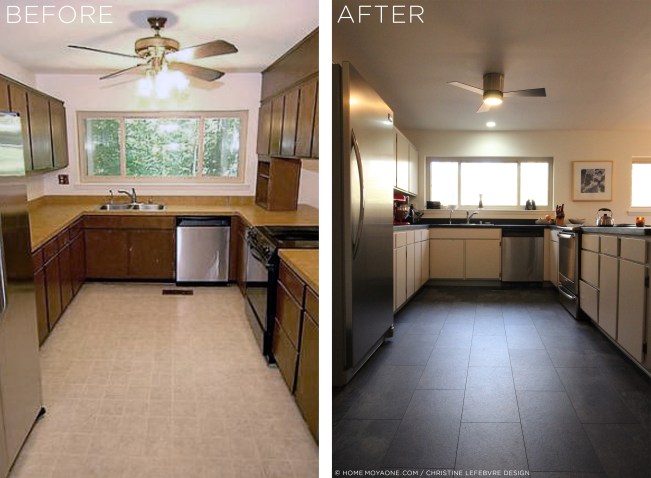
Ta-da! The kitchen finally looks respectable.
Here’s a rundown of everything we’ve done to it:
• We removed the upper cabinets on the right side of the kitchen, and patched and painted the ceiling.
• The cabinets were all cleaned, sanded, primed, and painted, inside and out. We used Behy Alkyd Semi-Gloss paint, color-matched to Benjamin Moore’s “London Fog.” It’s a light gray with some taupe to it. Sometimes it has a blue cast, other times it has a green cast, sometimes it even has a hint of purple, all depending on the time of day and which lights are on. We’re happy with the Alkyd paint—it’s very durable.
• We put in a new floor. After layers of old vinyl were torn out, the subfloor was screwed down in a few strategic places and leveling compound was used to smooth a floor hump. This foam underlayment was then put down to provide noise reduction and a moisture barrier between the kitchen and the unfinished basement crawl space below.
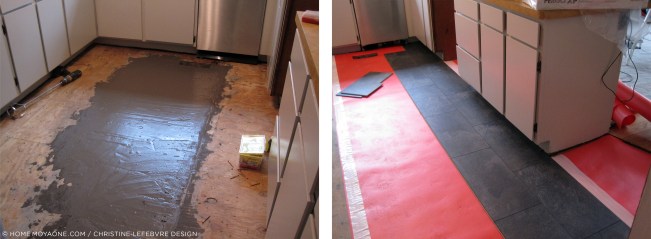
The kitchen floor is now entirely squeak-free, which is wonderful. We used Pergo XP Monson Slate laminate flooring tiles and we’re pretty happy with the budget-friendly choice. (Of course I’ll never be 100% happy until we get the real slate tiles of my dreams…)
• While I would love soapstone, or maybe quartz, countertops, I settled for…um, painting the existing linoleum.
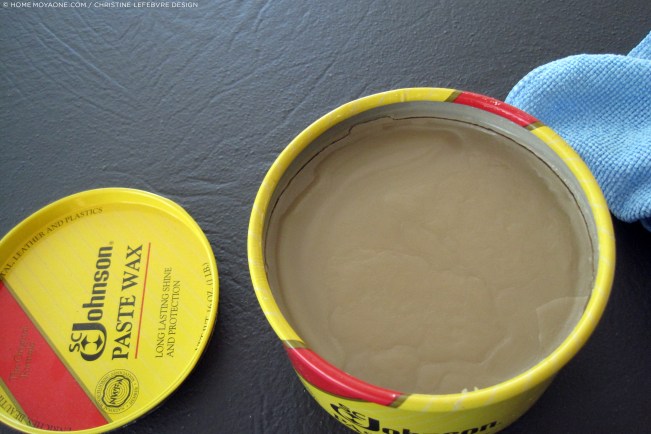
Yep, I painted the countertops. First I sanded the linoleum with a palm sander (wearing goggles, ear protection, and a serious dust mask), then rolled on a coat of primer and two coats of Rustoleum chalkboard paint. I used Johnson paste wax to seal it (the picture above is pre-wax)—wiped on the wax and allowed it to sit for a couple of minutes before I buffed it out. We are not precious with the countertops at all, and so we’ve put some scratches in them, but they’re easy to touch up. We keep paint in one of these bottles for that purpose.

• We got a new stove! Out came that awful, broken, old piece of junk and in its place we put a GE Profile slide-in induction range. It is SO good. Induction takes some time to get used to—it really does heat up incredibly fast—but if gas is not an option for you (as is the case for us) we highly recommend induction.
• And a new refrigerator! The old refrigerator was too big, and it was loud—it howled like an arctic wind (we had it checked out to see if it could be fixed, but ultimately it wasn’t worth it). We replaced it with a counter-depth Frigidaire Gallery All-Refrigerator, which is not only shallower but narrower than our old refrigerator; in fact it’s just about the perfect size for the space we have. We put a Hisense Dual Zone Chest Freezer in the pantry.

• We gave the walls two coats of flat Behr Premium Plus, color-matched to Benjamin Moore’s “Cloud White.” Trim was also painted Cloud White, in a semi-gloss finish. The trim took four coats—FOUR COATS!—and a lot of wood filler and caulk. In the photo below it looks like the door trim is a different color than the baseboard trim, but I promise that they are the same. Cloud White is like London Fog: the color changes drastically in different lights. We painted the pantry door London Fog, installed a new door knob, spray painted the hinges black, and installed a cat door.

• We replaced the fan! It’s a Monte Carlo Clarity II. We had one of those awful hardware store specials with the ruffled lampshades. You know the ones…they’re ubiquitous. We long ago took off the lampshades and used large globe lightbulbs, to ease the eyesore a little bit, but still…it feels so good to have a nicer fan up there. (Only four more to replace in the house…gah.)
• Other important details: We replaced the drinking water spigot. We cleaned the floor vents and spray painted them. We replaced the electrical outlets with “decora” style outlets (which we are doing throughout the house, room by room, for both outlets and light switches). We caulked the doors and windows.

• In the dining room, we installed a vintage chandelier in the dining room, which wasn’t my favorite so then I built a new chandelier, which is.
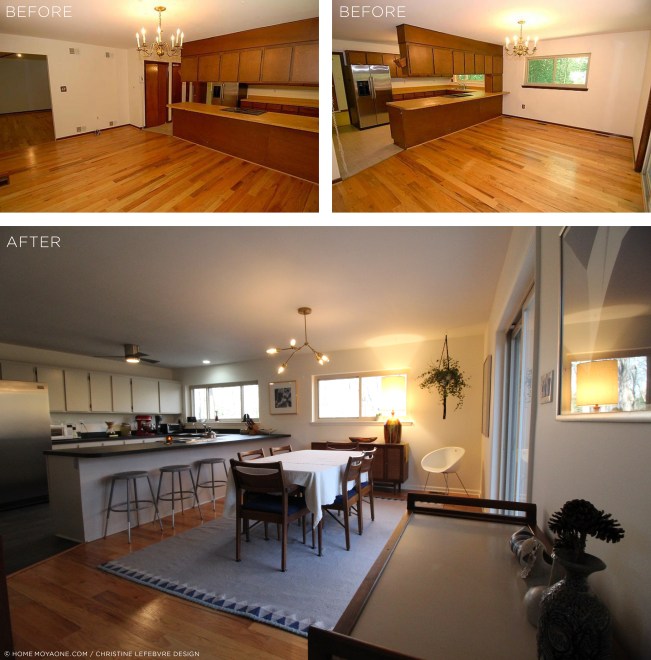
• We removed the accordion door and door frame from a closet in the kitchen, then built out the drywall to turn the closet into built-in bookshelves. (The floorplans in this post might illustrate that somewhat, and you can see the closet in the “before” photo above.)

The shelves are made from a high-grade plywood which I stained (a mix of different stains), then finished with a veneer on the front edge.

• We put up some new artwork: a photograph by Guy Lavigueur, “Éphéméritude no61“, which we got on a trip to Montréal; tiles from Motawi and Pewabic (wedding gifts) and a ceramic plate that I found at Goodwill.
There are still a couple things left to do, but we’re pretty close to being done in here.
Next up: a recap of 2015!

10 Responses to The post you’ve all been waiting for (right??): the kitchen reveal
Wow. Fantastic!
Super Job! Great entertaining area, confirmed first hand in December 2015!
Thanks, Dad! Thanks, Sheryl!
How was it installing that Pergo Monson? I see that reviews for the finished product are stellar, but I also hear that installation can be a pain. Looks great in your pics. Thanks
Installation was somewhat painful. The Pergo tiles are rigid and have to be installed on a near-perfectly flat floor surface, and so we had to fix a hump in the subfloor before the tiles could go down. That turned out to be more involved that we had anticipated and added some time to the installation. In the end though I’m glad we were forced to do a more thorough job preparing the floor, because it took care of a squeak problem—and our floor’s now level!
Gorgeous!! I always wanted to renovate that old kitchen. This is fantastic! :)
Thanks, Mekennan!
Just lovely.
Thanks, Paola! Good to see you yesterday!
Any chance you know where to get more of that Monson Slate, or if I could buy any extra you might have? I’d pay pretty much whatever you ask.
Sounds silly, but my wife and I are doing the same thing and ran a box short and Home Depot quit supplying!!
Paul, Near Pittsburgh PA (Murrysville it’s called). Ignore if this is a bother to you, just trying to figure this all out. Beautiful kitchen remodel!!!